Step 1 - Create a widget
Our goal in the first part of the tutorial is to register a new widget which will display the user's currently selected text in a popup window.
Entry file (src/widgets/index.tsx)
The backbone of a RemNote plugin is the code in the src/widgets/index.tsx file. It contains the code which gets run when your plugin is initialized and activated by the RemNote plugin system as well as code which can run when your plugin is deactivated to release resources.
Open up src/widgets/index.ts and take a look around.
At the top of the file you should see some imports:
import {
  WidgetLocation,
  declareIndexPlugin,
  ReactRNPlugin,
} from '@remnote/plugin-sdk';
These are functions and types imported from the RemNote plugin SDK (software development kit). All of the functions we are going to use for interacting with RemNote will come from the SDK library @remnote/plugin-sdk.
Next, let's examine the onActivate function. This is the first and most important method in the lifecycle of a plugin. The onActivate method is the first method to get called when your plugin gets loaded by the RemNote plugin system.
async function onActivate(plugin: ReactRNPlugin) {
  ...
}
Notice that the onActivate method gets passed a parameter called plugin of type ReactRNPlugin. The ReactRNPlugin class is like the swiss-army knife of RemNote plugin development - it provides quick access to the essential services that you will be using when writing RemNote plugins. For example, you can provide settings to the user by using the methods in the plugin.settings namespace, you can find and create Rem using methods in the plugin.rem namespace, and do operations on RemNote panes and windows via the plugin.window namespace.
You should remove any existing code inside the body of the onActivate function so we can start from a clean slate and start building a new widget.
async function onActivate(plugin: ReactRNPlugin) {}
Towards the bottom of the file you can see the second plugin lifecycle method:
async function onDeactivate(plugin: ReactRNPlugin) {}
The onDeactivate method is called when plugins are unloaded. This is where plugins should remove any event listeners they added in onActivate to avoid memory leaks.
declareIndexPlugin(onActivate, onDeactivate);
Finally, at the very bottom of index.ts the declareIndexPlugin function simply registers the plugin lifecycle functions with the RemNote plugin system so they can be called when the plugin gets activated and deactivated.
Creating a new widget
We are going to create a new widget to display the user's selected text by 1) adding a new selected_text_dictionary.tsx file in the widgets folder and 2) registering the widget with the plugin system in the onActivate method of the src/widgets/index.ts file.
Creating the SelectedTextDictionary widget
Start by creating a new file called selected_text_dictionary.tsx inside the widgets directory. This is how the directory should look after you create the file:
 ┣ 📂 src
 ┃ ┣ 📂 widgets
 ┃ ┣ ┃ 📜 index.tsx
 ┃ ┃ ┗ 📜 selected_text_dictionary.tsx    - New widget file
You can safely delete any other normal widget file which may be in the widgets folder, but don't delete the index.tsx index widget file.
Open the selected_text_dictionary.tsx and add the following code:
import { renderWidget } from '@remnote/plugin-sdk';

function SelectedTextDictionary() {
  return <div>Hello World!</div>;
}

renderWidget(SelectedTextDictionary);
Here we have created a simple React component called SelectedTextDictionary which will display a simple greeting message. Now we need to register it with the plugin system.
Registering the SelectedTextDictionary widget
In the body of the onActivate method in index.ts, register the widget we just created using the following code:
async function onActivate(plugin: ReactRNPlugin) {
  await plugin.app.registerWidget(
    'selected_text_dictionary',
    WidgetLocation.SelectedTextMenu,
    {
      dimensions: {
        height: 'auto',
        width: '100%',
      },
      widgetTabIcon: 'https://cdn-icons-png.flaticon.com/512/2069/2069571.png',
      widgetTabTitle: 'Dictionary',
    },
  );
}
There are a number of things to note here. First, the parameter "selected_text_dictionary" refers to the file name of the new SelectedTextDictionary widget we created in the widgets directory earlier. By registering a widget using its file name, the RemNote plugin system knows where to look to load the plugin when the user opens RemNote. Note that you do not need to include the widgets folder or the .tsx extension in the file name.
Secondly, we specify a location for the widget to render inside RemNote. We do this by selecting one of the predefined render locations in the WidgetLocation enum variable. Here we have selected the SelectedTextMenu location, which allows us to render a component in the selected text menu which shows when you select text in RemNote.
You could experiment with rendering the widget in other locations - check the widget location API documentation for the full list of locations.
WidgetLocation.RightSidebar
WidgetLocation.RightSideOfEditor
WidgetLocation.UnderRemEditor
...
Tip: If you are using VSCode and it displays errors about unrecognised types or functions, you need to import those types or functions from the modules they belong to. The easiest way to do this is to click on the unknown type, and press ctrl + . (or command + . if you are using a Mac).
{
  dimensions: {
    height: 'auto',   // expands your widget's size to contain its content.
    width: 350        // fixed width of 350px
  },
  widgetTabIcon: 'https://cdn-icons-png.flaticon.com/512/2069/2069571.png',
}
Finally, we pass an object specifying some widget options. The dimensions object sets the size of the widget. Check the widget dimensions documentation for more details. Widgets that render in tabs can declare a widgetTabIcon with an image URL which will be displayed in the tab. Since the SelectedTextMenu renders inside a tab, we pass a link to a dictionary icon which will render in the tab. You can swap this for another icon if you wish.
Testing the new widget
Our new widget should now be registered with the plugin system, so let's run the plugin to make sure everything is working.
If you still have the plugin running from the test we did earlier, you should shut down the plugin server by pressing ctrl + c (or command + c on Mac) inside the terminal where you ran npm run dev. Then you should re-run the plugin by running the same command again:
npm run dev
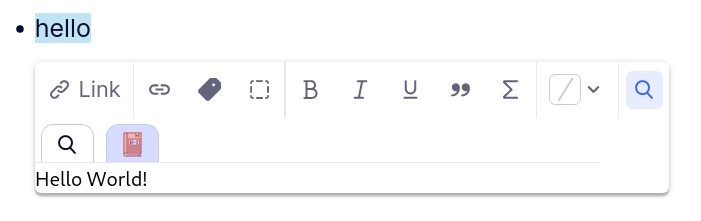
Select some text and click on the plugin icon on the right side of the selected text menu. Then click on the dictionary icon. You should see the "Hello World" component appear.
Hot reload
Most of the time while you are developing a plugin, it should automatically refresh and reload your plugin when the source code changes. However, when you add new widget files, you will need to fully restart the plugin by shutting down and restarting the plugin server using the steps above.